Yesterday, we discussed how to share your home files on your Windows PC to your G-Box. Today we are going to talk about sharing your folders from your Apple PCs. Like last time, the process is simple and requires no other applications other than your G-Box, home computer, and your TV!
1. Organize Your Content
The first step is to organize all of your content in your media folder on your computer into one folder. This folder can contain sub directories if you would like to further organize it. An example directory might be:
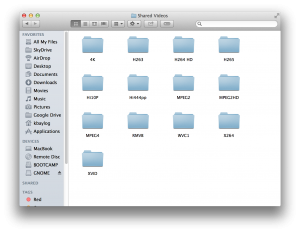
As you can see, I have Shared Videos and a bunch of directories underneath. This is our testing folder where we test multiple codecs for our Media Center or XBMC.
2. Share Your Content
Next, open up the search in the upper right hand corner and type in “Sharing”. Once the sharing application is open, select file sharing and add the folders that you would like to share.
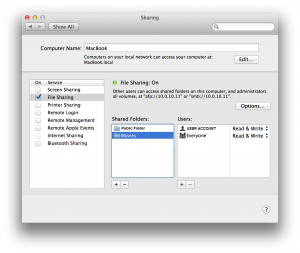
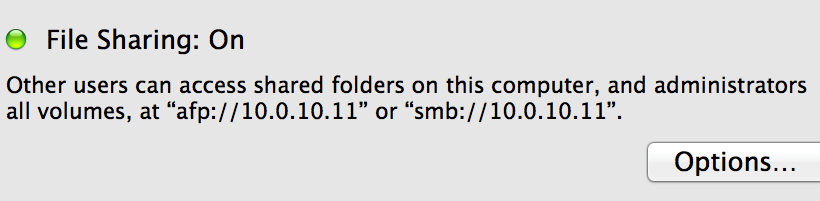
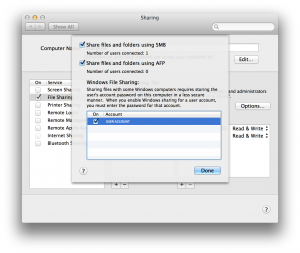 Adjust the permissions for each account (if you would like anyone to access, make sure everyone has Read & Write access). The path will be displayed above, but we will need to add some information to the end to successfully add the folder to Media Center. If you are going to use SMB over AFP, make sure to hit options and allow the user accounts. When you type in the path, you will be prompted to type in the user name and password.

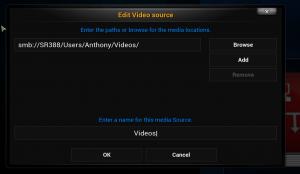
The path must be typed in a certain way into Media Center and XBMC. In my case the generated path was “afp://10.0.10.11″ and “smb://10.0.10.11″. I would type either “afp://10.0.10.11/Shared Videos” or “smb://10.0.10.11/Shared Videos” in my Media Center or XBMC, without quotes. NOTE 1: Some versions of Media Center and XBMC may have difficulties with the Apple File Protocol, but luckily we have the SMB portion. NOTE 2: Replace “Shared Videos” with the name of your folder.
3. Add Your Content
Now that we have our folder shared, we just need to add our folder into Media Center or XBMC. From the main menu, choose the item you want to add. We’ll use Videos in our example. Afterwards, choose “Files” and then “Add Videos…”. Replace Vidoes with whatever you selected, whether it’s pictures or music.
Finally, you can either Browse for the path or type it manually. I prefer to type the path manually, but you can browse for it too. In the box that says “<none>”, type in your path. (In my case “afp://10.0.10.11/Shared Videos” or “smb://10.0.10.11/Shared Videos” without quotes). If you hit Browse, make sure to select “Windows Network (SMB)”, followed by your workgroup. (Your workgroup is commonly titled “WORKGROUP”. If you don’t know your workgroup, contact your system administrator if applicable). Then browse to your computer name, and select the shared folder.
That’s it! You have now setup your SMB/AFP share and it will contain the same content as your folder on your computer. This will always stay up to date, so feel free to continue adding to your folder!
Troubleshooting
So you’ve got your folder shared, but it’s just not working right! Try these easy steps to see if this fixes your issues:
- Make sure both devices are on the same network. This will not work otherwise.
- Double check that the path you are typing matches the path that was given to you by your Mac.
- If you are having problems with authentication, make sure that the shared folder is shared with Everyone and that you are typing the passwords and usernames right.
- If you are using AFP, try SMB. Likewise, if you are using SMB, try AFP.